Most AI coding advice falls into two camps. Either "just ask it", which gets you a 7,000-line file that almost works, or a setup with three terminals, a Docker sandbox and an agent swarm that you will never run on your own codebase.
I'm a senior engineer doing enterprise consulting, and on the side I've shipped PageAI (16,000+ users), Crontap and a handful of other products with AI since 2023. Everything I do condenses into five plain prompts. No special tools, any language, any agent.
Here they are, followed by why each one works. If you prefer video, the full walkthrough is on YouTube:
 Watch the full walkthroughYouTube
Interview before you build
Why plain prompts beat fancy setups
An agent fails for one of three reasons: it guessed a decision you should have made, it lost track of the plan, or it never checked its own work. Tools don't fix any of those. The five prompts each close one gap:
- Interview so the agent stops guessing.
- Expand the plan into files so nothing lives only in a chat.
- Access, so the agent can verify against real services.
- Build in a fresh context that follows the plan and tests like a user.
- Review with fresh eyes before you trust the result.
In the video I build a 3D city builder for five port cities from an empty TanStack Start project. The same five prompts ship features in production codebases, including the one this blog runs on.
Step 1: interview before you build
The first prompt flips the usual dynamic. Instead of you describing a feature and the agent filling every blank with a guess, the agent interviews you one decision at a time, with its recommended answer attached.
Three details make it work:
- One question at a time. A wall of 20 questions gets skimmed. One question with a recommendation gets a real answer in seconds.
- Look before asking. The agent checks the codebase, docs, config and tests first, so it only asks what it genuinely cannot find out.
- The structured question tool. Cursor, Claude Code and most other agents now have a tool that shows multiple-choice answers plus a free-text option. Naming it in the prompt (
AskUserQuestion,AskQuestion, or equivalent) makes the agent actually use it.
Run this step in plan mode with the strongest model you have, Opus or Fable class. Planning is where a missed ambiguity is cheapest to fix, and the expensive model only reads and asks here, so the bill stays small.
For the demo, the interview covered scope (editor or showcase), which cities, how faithful the coastlines should be, road behaviour, persistence, onboarding and more. It's a lot of questions. Every one of them is a decision the agent would otherwise have made for me, silently.
The prompt is heavily inspired by Matt Pocock's grill-me skill.
Step 2: expand the plan into vertical slices
The plan you get after the interview is deliberately light. Prompt 2 makes the agent go back through the codebase and turn each task into a detailed spec, which surfaces the ambiguities it didn't see at the overview level. If it finds more, it interviews you again.
Two words matter most here: vertical slices. A slice is one feature built end to end (model, database, API, UI, tests) rather than "all the database work" first. Slices can be built, tested and committed one by one, and a half-finished plan still leaves you with working features.
The output is a folder under docs/plans with an overview file that links every slice and keeps a checklist:
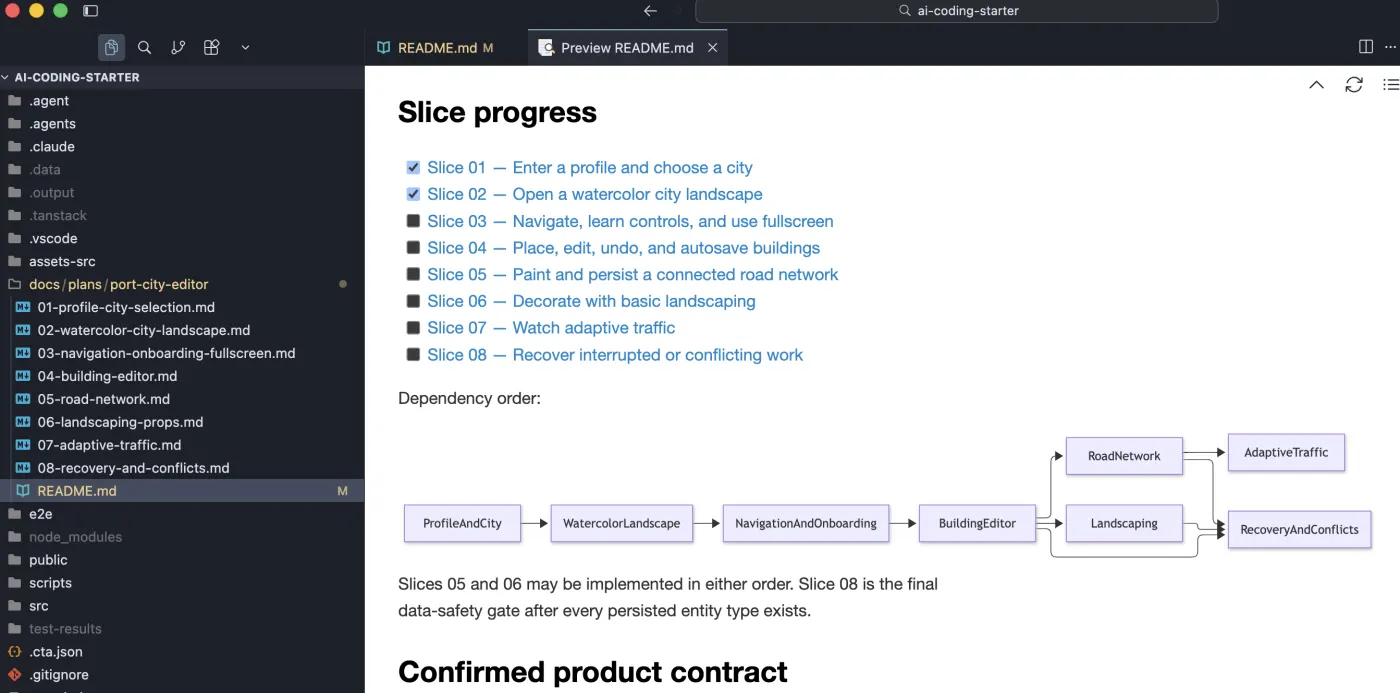
That checklist is the agent's memory. When a long build hits context compaction, crashes, or you move it to a different agent or a cloud runner, the next session reads the plan and continues from the first unchecked box. Each slice file goes further, with scope, dependencies, data model, tests to write, the exact verification commands, and its own acceptance checklist:
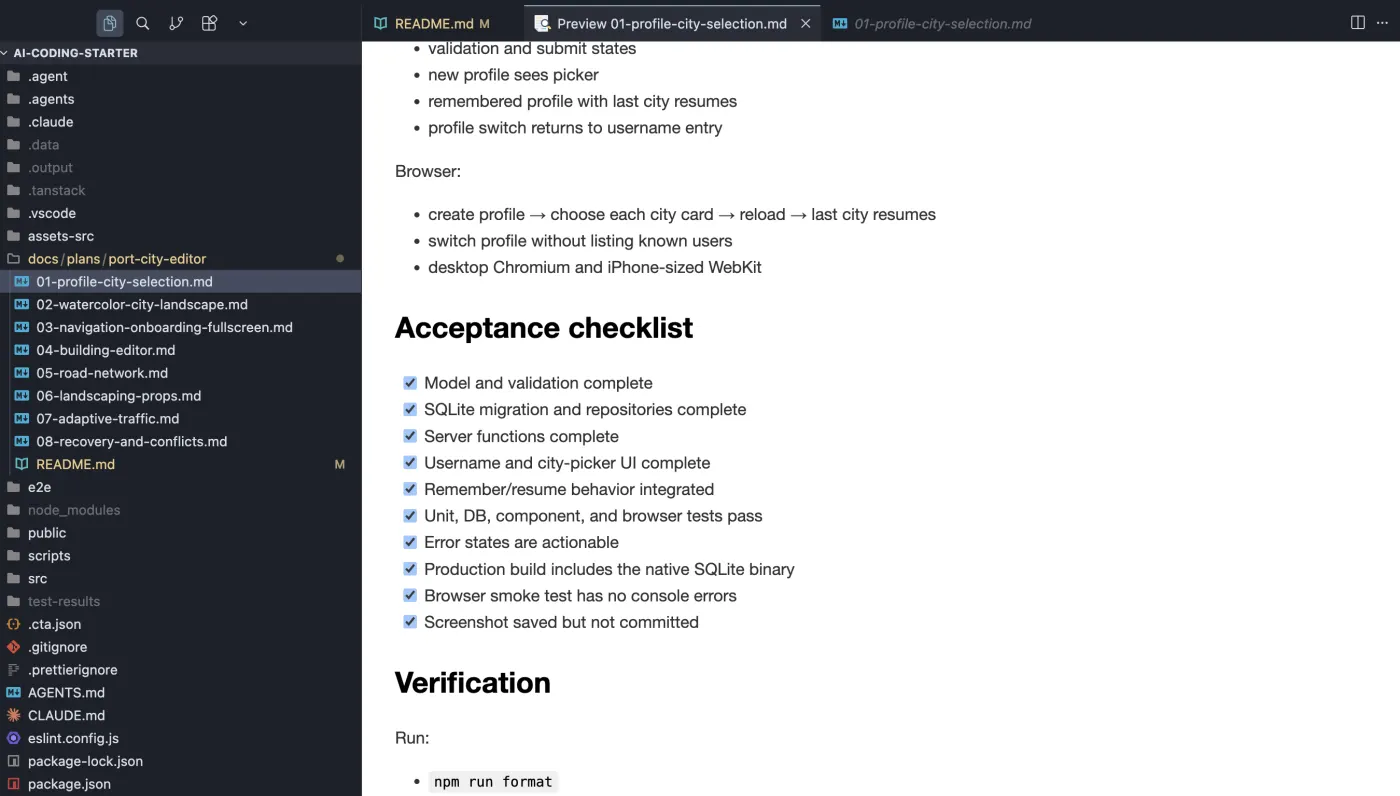
Once the plan files exist, the planning chat is disposable. Everything worth keeping is in the repo, next to the code, where future agents (and future you) can find out why a decision was made.
Step 3: give the agent access
The shortest prompt, and the one people skip. An agent can only be as good as its ability to verify its own work. If the feature touches payments, it needs your payment provider's test mode. If it touches a database, it needs to read and write one.
That does not mean production. Give it a development environment that behaves like production: test API keys, a dev database, MCP servers for the services involved, and test user accounts. Ask the question while the agent still has the whole plan in context, and it will list exactly what it needs.
Skip this, and you get the classic ending: "I couldn't test the checkout flow, so I've added a TODO for you to verify it manually." Then nothing works.
Step 4: build in a fresh context
Open a new chat. The planning conversation is long, full of abandoned options, and no longer needed, because the plan files hold everything. The fresh agent gets one instruction: implement the plan at this path until it's complete.
This is also where I switch models. Steps 1 to 3 need judgment; step 4 needs speed and the discipline to follow a detailed spec. The demo was built by Cursor Grok 4.6 (Extra High, Fast), a model plenty of people haven't heard of, and it produced a working 3D city builder with roads, traffic, landscaping, autosave and undo, because the plan left very little to guess.
Three lines in the prompt carry the weight:
- Use subagents to parallelize work where slices don't conflict. Faster, and each subagent starts with a clean context.
- Test end to end like a user would. Unit tests passing is not the bar. The agent runs the app, clicks through the flow and looks at the result. Your agent needs a computer.
- Commit and review periodically with another subagent. A reviewer with a fresh context reads each commit in isolation and catches mistakes before they compound across slices. Nine times out of ten it finds something.
Watch the agent's own plan before you send it. When I ran this, the agent proposed adding a TODO for me to do the browser smoke test. I deleted that line. Whenever an agent lacks access, it takes the path of least resistance, and that path ends with you doing the testing.
Step 5: verify with fresh eyes
Another fresh chat, another short prompt. Three review subagents audit the commits independently, looking for bugs, broken edge cases, broken UI, regressions, security risks, code smells, missing tests and drift from the plan. Like the builder, they are told to run the app and take screenshots rather than read the code and assume.
Then comes the odd line: "the agent finding the most valid serious issues gets 5 points." The points are worth nothing. The reviews still come back more thorough with that sentence than without it. Try it on your own code, with and without, and compare.
The result is one deduplicated, prioritized issue list. To fix it, go back to prompt 4: subagents implement the fixes, commit, and get reviewed again. For small changes, the quick one-line review is enough.
Setup: eyes and rules
I said the demo started from an empty project. That was slightly generous. It had two things you still need with current models, and both are one-time setup.
Eyes. The agent needs a way to drive your app's UI. For web apps I use the agent-browser skill, which lets the agent open pages, click buttons, fill forms and take screenshots:
npx skills add https://github.com/vercel-labs/agent-browser --skill agent-browserBuilding for iOS, desktop or something else? Install the equivalent skill or MCP server for your platform. Without eyes, "test it like a user would" quietly becomes "assume it works".
Rules. A short root AGENTS.md (or CLAUDE.md) with code standards. Agents love to output a lot of code fast, and left alone they keep appending to the same file until you have a 5,000-line module. This file keeps them honest about file size, reuse and testing. It's the one I start every project with:
Always apply these standards to all code you write.

# Implementation Process

1. Implement each slice step by step according to spec and write unit tests
2. **UI tasks only:** do an agent-browser smoke test
   - Check console for errors
   - Write minimal e2e test (happy path only)
   - Skip e2e if unit test already covers functionality
   - Save UI Screenshot to `.agent/screenshots/TASK-${ID}-{index}.png`, verify UI correctness. If debugging, use previous screenshots as reference. Do not commit them.
3. Run `eslint --fix`, `prettier --write` and end to end tests for affected files.
4. Run type checks and unit tests project-wide
5. All tests must pass. Broke unrelated test? Fix it before proceeding.
6. Commit changes using the Conventional Commit format.

# Code Quality Standards

## Reuse Before Creating

Before writing new code, analyze existing utilities, components, hooks, helpers and tests:

1. **Search first**: grep/glob for similar functionality before implementing
2. **Extend if close**: if something exists that's 80% of what you need, extend it
3. **Extract if duplicating**: if you're about to copy-paste, extract to shared module instead

## File Size & Organization

Keep files between **200-300 lines max**. If a file exceeds this:

1. **Split by responsibility**: one module = one concern
2. **Extract sub-components**: UI pieces that can stand alone should
3. **Separate logic from presentation**: hooks/utils in their own files
4. **Group by feature**: co-locate related files, not by type

Signs a file needs splitting:

- Multiple unrelated exports
- Scrolling to find what you need
- "Utils" file becoming a junk drawer
- Component doing data fetching + transformation + rendering

## Code Style

1. Prefer writing clear code and use inline comments sparingly
2. Document methods with block comments at the top of the method
3. Use Conventional Commit format

## Test To Verify Functionality

If you didn't test it, it doesn't work.

Verify written code by:

- Running unit tests
- Running end to end tests
- Checking for type errors
- Checking for lint errors
- Smoke testing and checking for runtime errors in a real environment
- Taking screenshots and verifying the UI is as expectedMake it yours: add the commands your stack uses and the mistakes your agents keep repeating. Both pieces, plus the demo project, are in the ai-coding-starter repository.
Turn the prompts into skills
Copy-pasting five prompts is fine. The ten seconds it takes won't make or break your project. Once the workflow sticks, though, turn each prompt into a reusable skill or slash command so you can call it by name. Anthropic's skill-creator skill does most of the work: hand it the prompt and ask for a skill.
After you ship: a clock, a watchdog and error eyes
Five prompts get you a working product. What AI-built products almost always ship without is everything that happens when nobody is clicking: the nightly sync, the weekly digest, the webhook that should fire every 15 minutes, and someone noticing when any of it stops.
That's the part we built Crontap for:
- A clock for your app. Call any URL on a schedule, on any cron expression and in the timezone you choose (down to every minute on Pro). Stitch services together, sync data between APIs, or kick off scheduled AI jobs without running a server just to keep time.
- A watchdog. Uptime monitoring tells you when your app or API goes down, and heartbeats tell you when a background job silently stops checking in. Alerts go to email on every plan, and to Slack, Discord or Telegram on paid plans.
- A public face. Status pages show users what's up before they email you.
- Agent-friendly. Your coding agent can set all of it up through the Crontap MCP server and Agent Skills, so it fits right into step 3.
For errors, give the agent eyes on production too. Sentry Seer (Sentry sponsored the video) catches exceptions, works out the root cause, and can hand a fix to Cursor, Claude Code or Copilot with all of that context attached.
The free Starter tier includes two schedules, uptime monitors or heartbeats combined, with email alerts, so you can wire up the boring-but-critical parts in the same session you built the feature. Schedule your first job
FAQ
Coding with AI agents: common questions
- Do these prompts work in Cursor, Claude Code, Codex and Copilot?
- Yes. They are plain text and assume only three things most coding agents now have: a plan mode or planning step, a structured question tool for the interview, and subagents. If your tool lacks a question tool, the agent asks in chat instead. If it lacks subagents, drop that line and let one agent work through the slices in order.
- Which AI model should I use for coding?
- Use the strongest model you have (Opus or Fable class) for steps 1 to 3, because planning is where missed ambiguities get expensive. For step 4, pick the best balance of speed and intelligence: the demo was built with Cursor Grok 4.6 following a detailed plan. For the review in step 5, the same model works because the fresh context does most of the work, and a different model can add a second perspective.
- Do I need plan mode?
- It helps for steps 1 to 3 because it stops the agent from writing code before the decisions are made. If your tool has no plan mode, the prompts still work: the interview prompt tells the agent to clarify before acting.
- Does this work in an existing codebase, or only new projects?
- Both. In an existing codebase the interview prompt tells the agent to read the code, docs, config and tests before asking you anything, so the questions get sharper. The demo started from an empty TanStack Start project; the same prompts ship features in production codebases.
- Why start a fresh chat for steps 4 and 5?
- Step 2 saves everything worth keeping into markdown files under docs/plans, so the planning chat is disposable. A fresh context for the build keeps the agent focused on the plan instead of an hour of back-and-forth, and a fresh context for review means the reviewer judges the commits without the builder's assumptions.
- Does the '5 points' incentive actually work?
- In my experience, yes. The points are worth nothing, yet reviews with the incentive line come back more thorough than without it. It costs one sentence, so try the prompt with and without it on your own code and compare.
- Can I use this to fix bugs, not just build features?
- Yes. Describe the bug as the request in step 1, and the interview pins down the expected behaviour, reproduction steps and edge cases. For a small fix you can usually skip step 2 and go straight from the interview to the build and review prompts.
- How do I stop AI from writing huge, messy files?
- Give it rules before it starts. A short root AGENTS.md (or CLAUDE.md) that caps files at 200 to 300 lines, asks it to search for existing code before writing new code, and requires tests and a real smoke test prevents most 5,000-line modules. The full file is in the setup section of this post.
Start with one feature
Pick the next feature on your list and run the five prompts on it. The first interview will feel slow. By the review step you'll see why it was worth it.
When it ships, give it a clock and a watchdog. Crontap's free tier is enough to schedule the first jobs and know the moment one stops. Schedule your first job